



Programming a Robot Does Not Have to be Difficult!
Contents List
- Introduction
- Why Robot Programming Is Easier Than It Looks?
- What Does It Mean to Program a Robot?
- The Basic Architecture of a Robot
- Choosing the Right Programming Platform
- Understanding Inputs, Decisions, and Outputs
- How Sensors Help a Robot Understand Its Environment?
- How Motors and Actuators Make a Robot Move?
- The Robot Control Loop
- Start With Simple Robot Behaviors
- Using Arduino to Program a Robot
- Using Libraries to Simplify Robot Programming
- From Manual Control to Autonomous Operation
- Using Conditions and Decision-Making
- Using State Machines for More Organized Programs
- Programming More Advanced Robots With ROS 2
- Testing and Debugging a Robot
- Common Robot Programming Mistakes
- A Practical Learning Path for Beginners
- Safety Considerations When Programming Robots
- Frequently Asked Questions
- Conclusion
Reading Time is 20 minute
1- Introduction
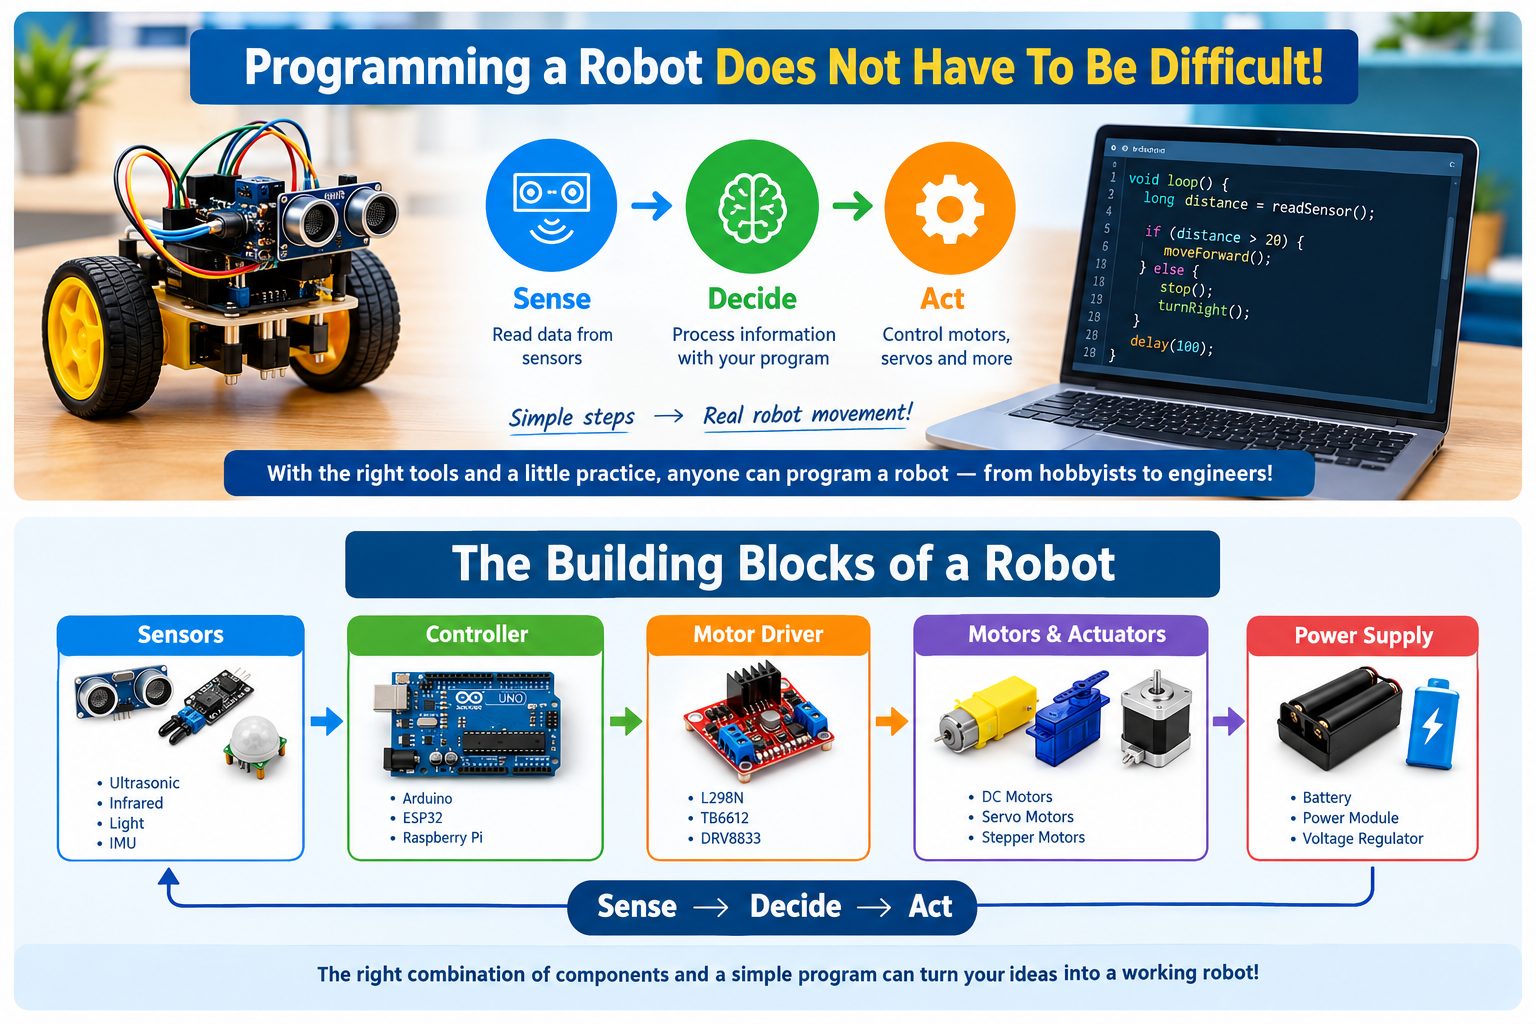
Welcome to the exciting world of robotics! Many people look at a complex machine and think, “I could never program that.” But the truth is, programming a robot does not have to be difficult! Whether you are a hobbyist just starting out, a beginner looking for a new challenge, or an experienced engineer, the journey of bringing a machine to life is accessible to everyone. In this article, we will break down the complexities of robot programming into simple, manageable steps, providing you with the knowledge to build and code your own robotic creations.
2- Why Robot Programming Is Easier Than It Looks
Programming a Robot may sound like a complicated task that requires advanced mathematics, artificial intelligence, or extensive programming experience. In reality, many robot projects can be built and programmed using a small number of fundamental concepts.
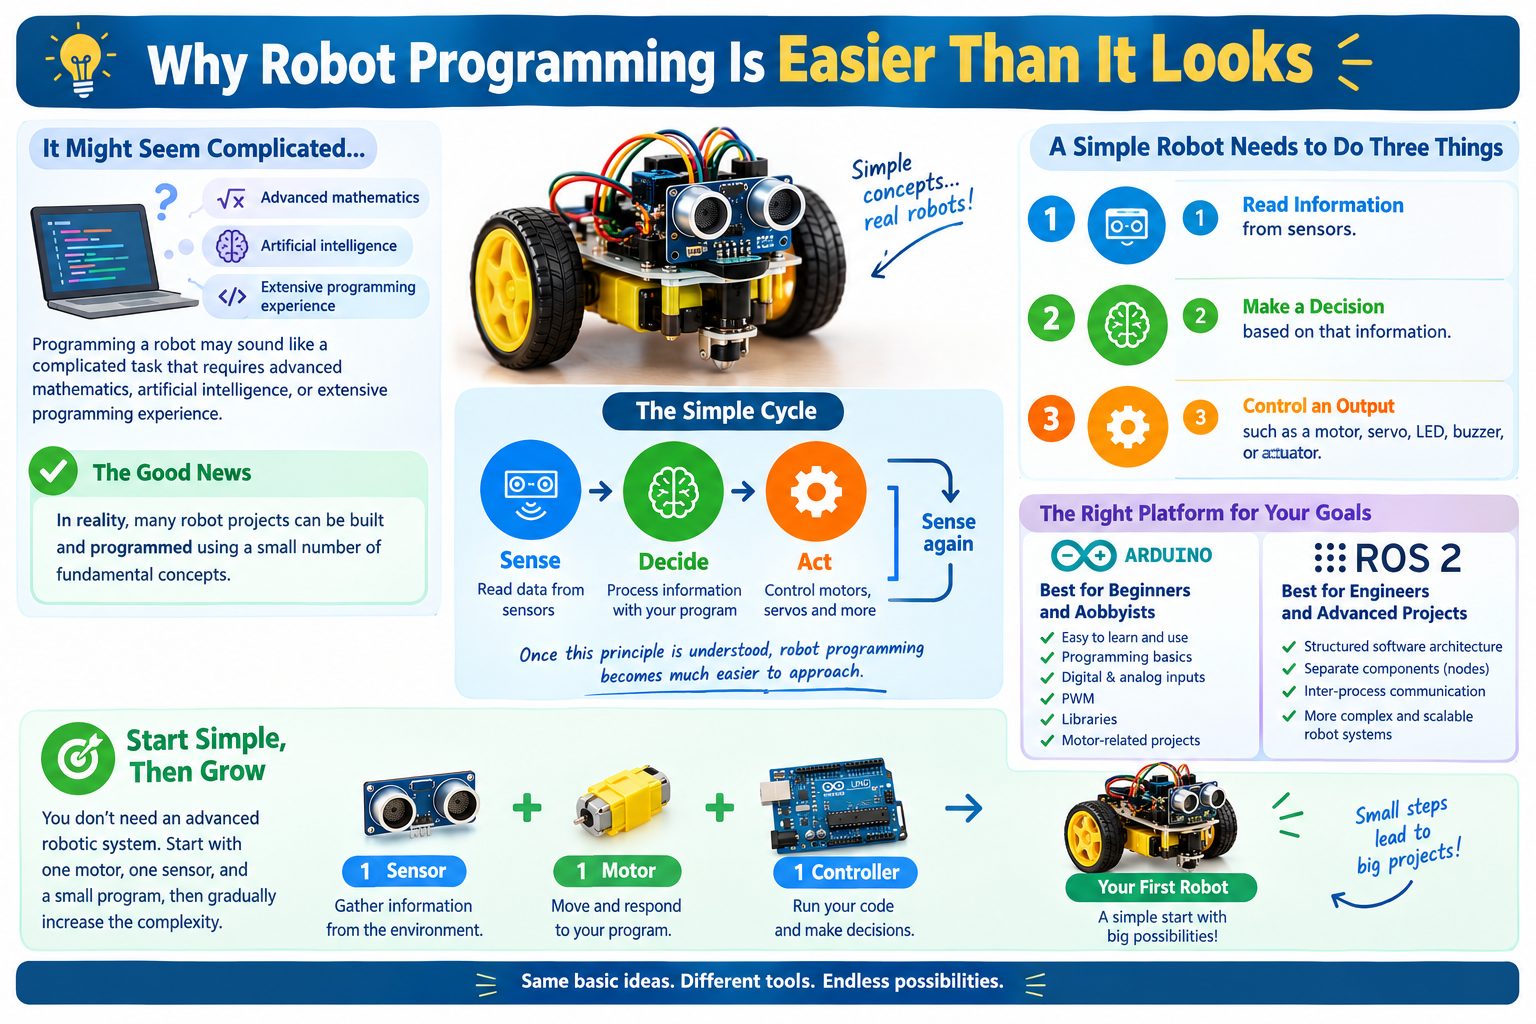
A simple robot usually needs to do three basic things:
- Read information from sensors.
- Make a decision based on that information.
- Control an output, such as a motor, servo, LED, buzzer, or actuator.
This creates a simple cycle:
Sense → Decide → Act → Sense again
Once this principle is understood, programming a Robot becomes much easier to approach.
For beginners and hobbyists, platforms such as Arduino provide a straightforward way to learn these concepts. Arduino’s official documentation provides tutorials covering programming, digital and analog inputs, PWM, libraries, and motor-related projects.
For engineers and more advanced robotics projects, frameworks such as ROS 2 provide a more structured approach for dividing a robot application into separate software components that communicate with each other.
The important point is that you do not have to begin with an advanced robotic system. You can start with one motor, one sensor, and a small program, then gradually increase the complexity.
3- What Does It Mean to Program a Robot?
Programming a robot means creating instructions that tell the robot how to respond to information and perform actions.
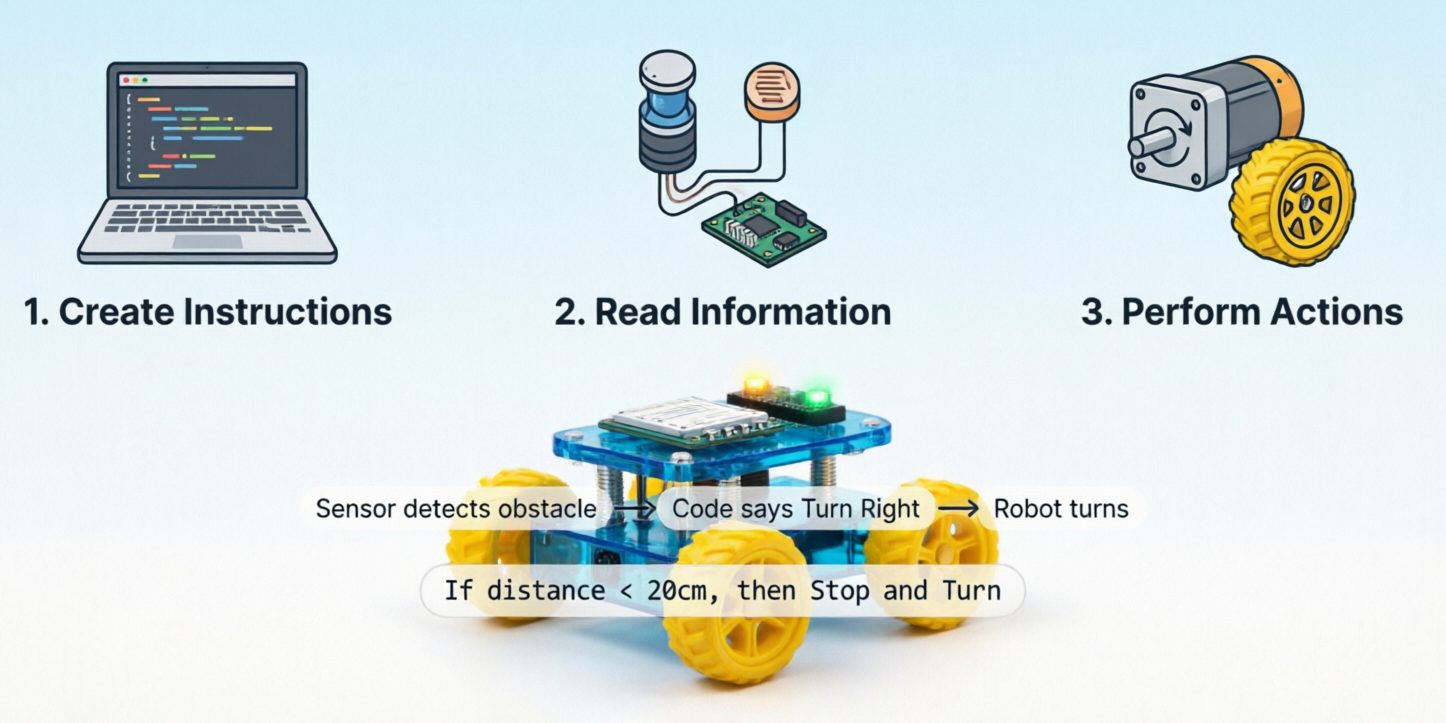
For example, consider a simple obstacle-avoiding robot.
The robot could follow this sequence:
- Read the distance sensor.
- Determine whether an obstacle is nearby.
- If the path is clear, move forward.
- If an obstacle is detected, stop.
- Turn in another direction.
- Continue moving.
- Repeat the process.
The program does not need to understand the world in the same way a human does. It only needs to process the information provided by its sensors and execute the programmed rules.
This is one of the most important concepts for anyone beginning robotics: a robot becomes intelligent through the combination of sensing, decision-making, and action.
4- The Basic Architecture of a Robot
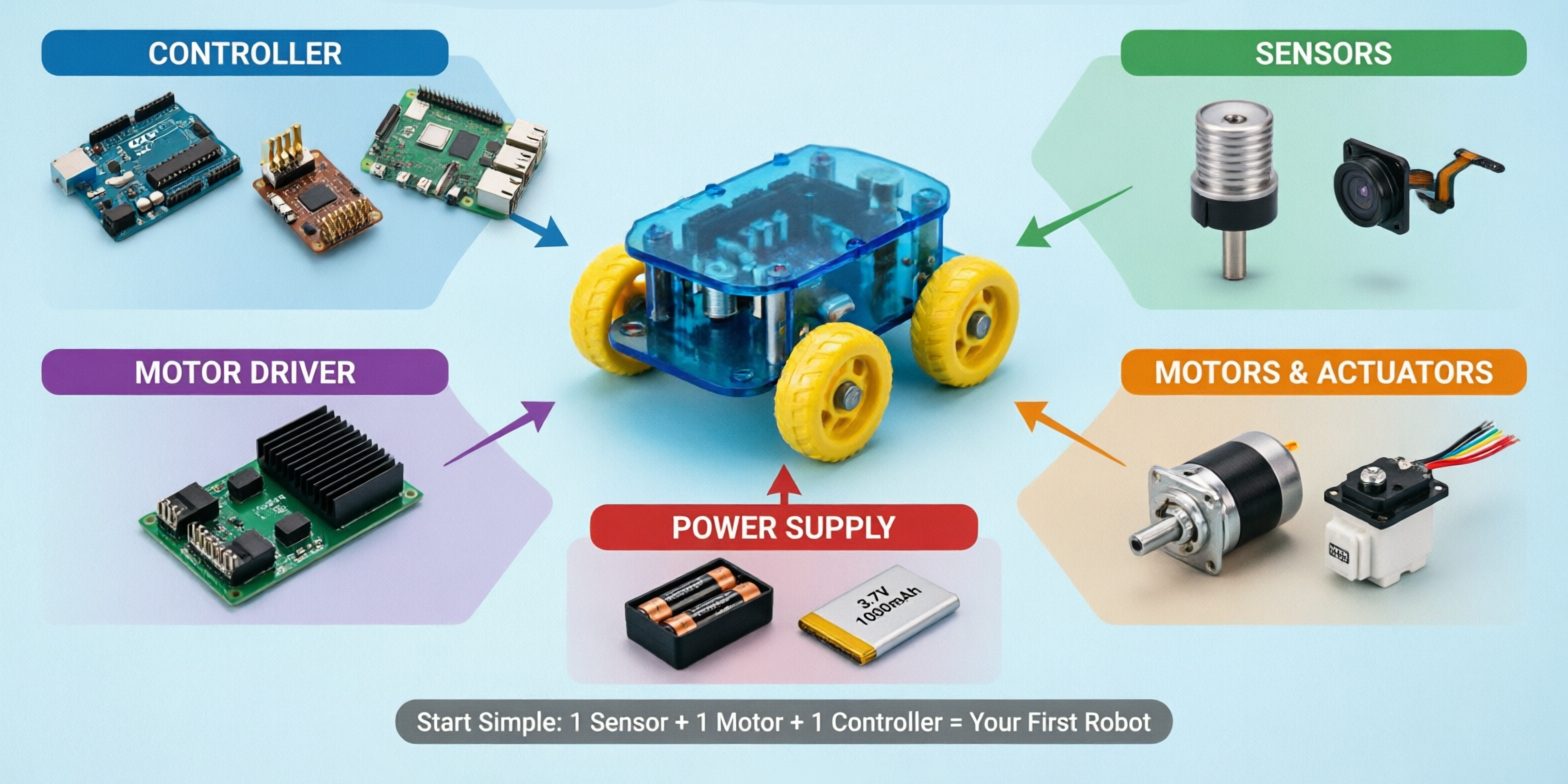
A typical small robot can be divided into several major parts:
Controller
The controller is the electronic “brain” of the robot.
Examples include:
- Arduino boards
- ESP32-based boards
- Raspberry Pi computers
- Other microcontrollers and single-board computers
The controller executes the program and communicates with sensors and actuators.
Sensors
Sensors provide information about the robot and its environment.
Examples include:
- Ultrasonic distance sensors
- Infrared sensors
- Light sensors
- Temperature sensors
- Encoders
- Accelerometers
- Gyroscopes
- Cameras
Motor Driver
A microcontroller usually should not drive a DC motor directly from a GPIO pin.
A motor driver or motor-control circuit is normally used between the controller and the motor. It provides the appropriate electrical interface and allows the controller to command the motor safely within the driver’s specifications.
Motors and Actuators
These components convert electrical commands into physical movement.
Examples include:
- DC motors
- Servo motors
- Stepper motors
- Linear actuators
Power Supply
The power system provides the energy required by the controller, sensors, motors, and other components.
Power should be treated as part of the robot design, not as an afterthought. Motors can introduce significantly different current requirements from logic circuits, so the power architecture must be appropriate for the hardware being used.
5- Choosing the Right Programming Platform
The programming platform should match the complexity of the robot.
Arduino
Arduino is an excellent starting point for learning robotics because it combines accessible hardware with a large software ecosystem.
Arduino’s official learning material covers programming fundamentals, digital pins, analog inputs, PWM, libraries, servo control, and other concepts useful for robotics.
It is particularly suitable for:
- Beginner robots
- Line-following robots
- Obstacle-avoiding robots
- Small mobile robots
- Servo-based projects
- Sensor experiments
- Motor-control projects
MicroPython and Similar Environments
Some modern boards support MicroPython, allowing developers to program embedded systems using Python.
Arduino’s Alvik robot, for example, supports MicroPython, Arduino programming, and block-based programming, demonstrating how different programming approaches can be used for robotics education.
Raspberry Pi and Linux-Based Platforms
A Raspberry Pi-class computer becomes useful when a robot requires more computational resources, such as:
- Computer vision
- Networking
- Data processing
- Higher-level robotics software
- Python applications
- Integration with other computers
ROS 2
ROS 2 is more appropriate when a robot has a larger software architecture involving multiple processes or computing components.
ROS 2 organizes applications around nodes and communication interfaces. Nodes can publish and subscribe to topics, provide or use services, and use actions for longer-running tasks.
The important lesson is that not every robot needs ROS 2. A small Arduino robot can often be programmed much more simply without introducing a robotics framework.
6- Understanding Inputs, Decisions, and Outputs
One of the easiest ways to understand robot programming is to divide a program into three stages.
Input
The robot receives information.
For example:
Distance = 15 cm
Decision
The program evaluates the information.
For example:
If distance < 20 cm, an obstacle is too close.
Output
The robot performs an action.
For example:
Stop motors and turn right.
This can be represented as:
Sensor → Program Logic → Motor
As the robot becomes more advanced, additional sensors, algorithms, and control systems can be added to this basic structure.
7- How Sensors Help a Robot Understand Its Environment
- A robot cannot make useful decisions without information.
- A sensor converts a physical condition into data that the controller can process.
For example:
- An ultrasonic sensor can be used to estimate the distance to an object.
- A light sensor can provide information about brightness.
- An encoder can provide information related to wheel rotation.
- The program then converts this information into a decision.
For example:
If distance is greater than 30 cm → move forward.
If distance is less than or equal to 30 cm → stop and turn.
- The sensor itself does not decide what the robot should do.
- The program determines how the sensor data is interpreted.
8- How Motors and Actuators Make a Robot Move
Motors are responsible for converting electrical energy into mechanical movement.
Different motors are suited to different applications.
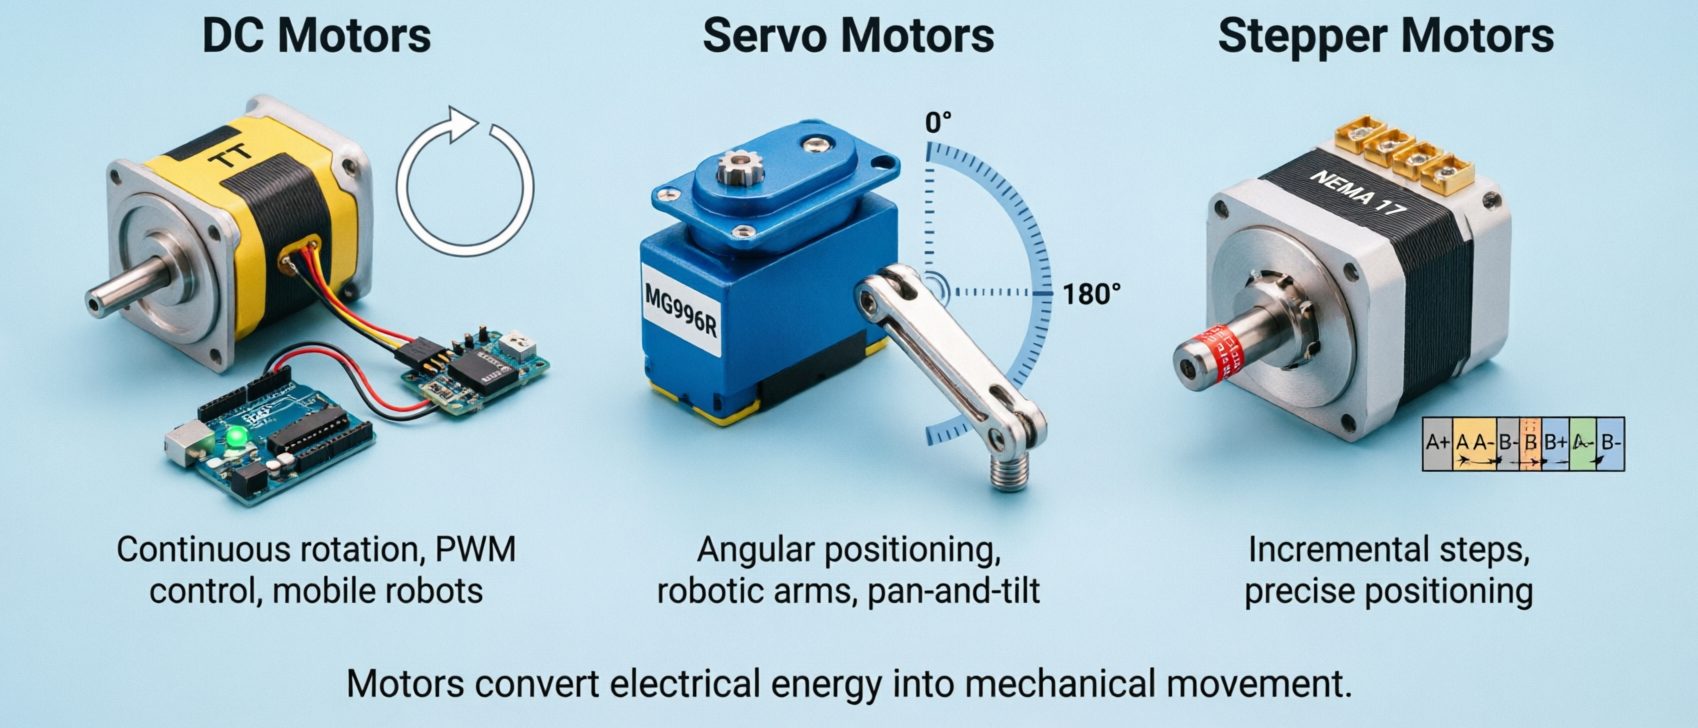
DC Motors
- DC motors are commonly used for mobile robots because they can continuously rotate and are relatively simple to control.
- Arduino-based robotics tutorials demonstrate controlling DC motor speed using PWM and a suitable motor-control circuit.
Servo Motors
Servo motors are useful when the robot needs controlled angular positioning.
They are commonly used for:
- Robotic arms
- Sensor scanning mechanisms
- Pan-and-tilt systems
- Small robotic mechanisms
Arduino and Adafruit both provide beginner-friendly examples for servo control.
Stepper Motors
- Stepper motors are useful when controlled incremental movement or positioning is required.
- They can move in individual steps and can be used in applications where controlled rotation is important.
9- The Robot Control Loop
A robot usually does not execute one instruction and then stop.
Instead, it repeatedly performs a control loop.
A simplified robot program looks like this:
Read sensors
↓
Process the information
↓
Make a decision
↓
Control the actuators
↓
Wait or perform timing operations
↓
Read the sensors again
↓
Repeat
This loop is fundamental to robotics.
For example, an obstacle-avoiding robot may continuously measure its distance from nearby objects and adjust its motor commands accordingly.
The faster and more reliably this loop operates, the more responsive the robot can become—although the required timing depends on the application.
10- Start With Simple Robot Behaviors
A common mistake is trying to build a fully autonomous robot immediately.
A better approach is to develop one behavior at a time.
Step 1: Test One Motor
Start by making one motor rotate.
Verify:
- Motor direction
- Motor driver operation
- Power supply
- Wiring
- Speed control
Step 2: Test Both Motors
Once one motor works, control both motors.
For a two-wheel robot, you can create basic commands such as:
- Forward
- Reverse
- Turn left
- Turn right
- Stop
Step 3: Add One Sensor
Connect a single sensor and display its readings.
Before making the robot autonomous, make sure the sensor data is correct.
Step 4: Combine the Sensor and Motors
Now create a simple rule:
If the sensor detects an obstacle, change the motor commands.
This incremental approach makes troubleshooting considerably easier.
11- Using Arduino to Program a Robot
Arduino is particularly useful for beginners because the development workflow is relatively straightforward.
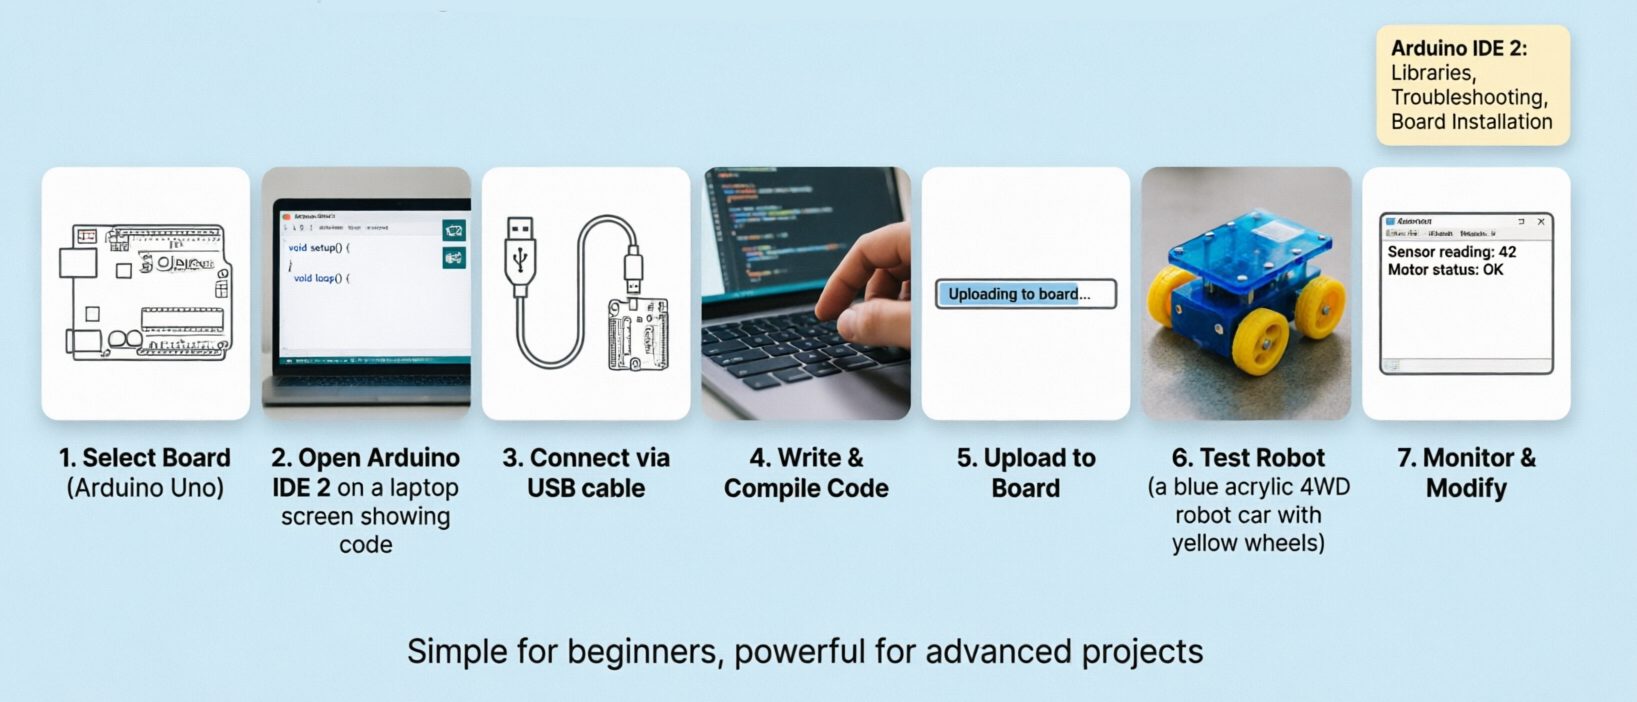
A typical workflow is:
- Select the appropriate Arduino board.
- Install or open the Arduino IDE.
- Connect the board to the computer.
- Write or modify the sketch.
- Select the board and port.
- Compile the program.
- Upload the program.
- Test the robot.
- Monitor the results.
- Modify the program and repeat.
Arduino’s current documentation provides dedicated information for Arduino IDE 2, board installation, uploading sketches, libraries, and troubleshooting.
This development cycle is simple enough for beginners while still being useful for more advanced embedded projects.
12- Using Libraries to Simplify Robot Programming
You do not always need to write every hardware-control function yourself.
Libraries provide reusable software components that allow a program to communicate with hardware more easily.
For example, a robotics project may use a library for:
- A motor driver
- A servo
- A display
- A sensor
- A communication module
Arduino provides a library ecosystem and documentation for working with libraries.
Adafruit’s robotics examples also demonstrate how installing the appropriate library can simplify motor-control programming.
For beginners, libraries reduce unnecessary complexity.
For engineers, they can also reduce development time and provide tested abstractions, although the library’s documentation, compatibility, and implementation should still be reviewed when reliability is important.
13- From Manual Control to Autonomous Operation
A useful progression for a mobile robot is:
Manual control → Assisted control → Autonomous control
Manual Control
The user directly controls the robot.
For example:
Button → Controller → Motor
Assisted Control
The user controls the robot, but sensors help prevent certain problems.
For example, the robot may stop automatically when an obstacle is detected.
Autonomous Control
The robot makes decisions based on sensor information without continuous human input.
For example:
Sensor → Decision Algorithm → Motor Commands
Adafruit’s robotics examples demonstrate this progression by first controlling a robot manually and then adding proximity sensing to allow autonomous obstacle avoidance.
14- Using Conditions and Decision-Making
Conditional statements are among the most important programming tools in robotics.
A simple robot may use rules such as:
If the path is clear → move forward.
If an obstacle is detected → stop.
If the obstacle is on the left → turn right.
If the battery is low → stop the robot.
- These simple conditions can eventually become much more sophisticated.
- The key is to keep the logic understandable.
- Instead of creating one enormous program, divide the robot’s behavior into smaller functions.
For example:
readSensors()calculateDecision()moveForward()turnLeft()turnRight()stopRobot()
This makes the program easier to test and maintain.
15- Using State Machines for More Organized Programs
- As robot behavior becomes more complicated, a collection of
ifstatements can become difficult to maintain. - A state machine provides a cleaner approach.
For example, a mobile robot might have these states:
IDLE
↓
MOVING_FORWARD
↓
OBSTACLE_DETECTED
↓
TURNING
↓
MOVING_FORWARD
- Each state defines what the robot should do and what condition causes it to transition to another state.
- State machines are especially useful when a robot needs to manage several behaviors without losing track of what it is currently doing.
- This approach is useful for both hobby projects and professional embedded systems.
16- Programming More Advanced Robots With ROS 2
When a robot becomes more complex, a single microcontroller program may no longer be the most suitable architecture.
ROS 2 introduces the concept of nodes, where each node can perform a logical function within the robot system. Nodes can communicate with each other through topics, services, and actions.
For example, a larger robot could contain separate software components for:
- Camera processing
- Sensor processing
- Localization
- Navigation
- Motor control
- User interface
ROS 2 topics are designed for continuous data streams such as sensor data and robot state. Services are intended for relatively short request-and-response operations, while actions are designed for longer-running operations where feedback and cancellation may be required.
This architecture allows engineers to build more complex robotic systems without putting all functionality into one large program.
However, ROS 2 introduces additional concepts and infrastructure, so it is usually better to understand basic programming, sensors, actuators, and control first.
17- Testing and Debugging a Robot
Robot programming is not simply about writing code and uploading it.
Testing is an essential part of robotics development.
Test the Hardware First
Before debugging software, verify:
- Power supply
- Ground connections
- Motor driver wiring
- Sensor connections
- Correct voltage levels
- Mechanical assembly
Test Each Component Separately
Test the motor without the sensor.
Then test the sensor without the motor.
Then combine them.
This makes it much easier to identify the source of a problem.
Use Serial Monitoring
For Arduino projects, serial output can provide useful information about sensor readings and program decisions.
For example:
Distance: 42 cm
Distance: 35 cm
Distance: 18 cm
Obstacle detected
This can reveal whether the problem is in the sensor, the decision logic, or the motor-control section.
Change One Thing at a Time
If you change five parts of the program simultaneously, it becomes difficult to know which change fixed or caused the problem.
A better engineering approach is:
Change → Test → Observe → Record → Continue
18- Common Robot Programming Mistakes
- Trying to Build Everything at Once
- Start with a small working system.
- A robot that moves forward reliably is a better starting point than a complicated robot that does nothing reliably.
Ignoring Power Requirements
- Motors can create electrical problems that appear to be software problems.
- Unexpected resets, sensor instability, or communication problems can sometimes originate from an unsuitable power arrangement.
Testing Only the Complete System
- If the complete robot fails, it can be difficult to identify the problem.
- Test individual subsystems first.
Writing One Large Program
- Large blocks of code are difficult to understand and maintain.
- Use functions and clear program structure.
Ignoring Sensor Noise
- Real sensors are not always perfectly stable.
- A sensor reading can fluctuate slightly even when the physical environment has not changed significantly.
- Depending on the application, filtering, averaging, hysteresis, or other signal-processing techniques may be appropriate.
Assuming the Robot Will Behave Exactly Like the Simulation
A real robot has:
- Mechanical friction
- Wheel slip
- Motor differences
- Battery voltage changes
- Sensor errors
- Electrical noise
- Physical limitations
Testing on real hardware remains essential.
19- A Practical Learning Path for Beginners
A structured learning path can make robotics much easier.
Level 1: Learn Basic Programming
Start with:
- Variables
- Data types
- Conditions
- Loops
- Functions
- Basic debugging
Level 2: Learn Microcontroller Basics
Learn:
- Digital inputs and outputs
- Analog inputs
- PWM
- Serial communication
- Timers and timing concepts
Arduino’s learning documentation provides a structured introduction to these fundamentals.
Level 3: Control Simple Hardware
Work with:
- LEDs
- Buttons
- Buzzers
- Servos
- DC motors
Level 4: Add Sensors
Try:
- Distance sensors
- Light sensors
- Encoders
- IMUs
Level 5: Build a Simple Mobile Robot
Combine:
Controller + Motor Driver + Motors + Sensor
Then implement simple autonomous behavior.
Level 6: Improve the Control Algorithm
Once the basic robot works, explore:
- Sensor filtering
- PID control
- Encoders
- Closed-loop control
- State machines
- Path following
Level 7: Move Toward Advanced Robotics
For larger systems, begin learning:
- Linux
- Python
- C++
- ROS 2
- Robot simulation
- Localization
- Navigation
- Computer vision
This progression allows a beginner to develop skills gradually while giving engineers a clear path toward more advanced robotics systems.
20- Safety Considerations When Programming Robots
A robot can contain moving mechanical parts and high-current electrical components, so safety should always be considered during development.
Before testing:
- Keep fingers away from moving mechanisms.
- Secure the robot so it cannot unexpectedly move.
- Check wiring before applying power.
- Use appropriate motor drivers and power supplies.
- Avoid short circuits.
- Test new programs at low speed when possible.
- Have a reliable way to disconnect power.
- Do not leave an experimental robot operating unattended.
A useful development practice is to test the robot with the wheels lifted from the ground when appropriate. This allows motor commands to be verified before allowing the robot to move freely.
21- Frequently Asked Questions
Is robot programming difficult for beginners?
It can look difficult because robotics combines programming, electronics, mechanics, and control. However, a beginner can start with simple programs involving one sensor and one actuator and gradually build more advanced systems.
Do I need advanced mathematics to program a robot?
Not for basic robot projects. Simple robots can be programmed using fundamental programming concepts and straightforward decision-making. Mathematics becomes increasingly important for areas such as kinematics, localization, computer vision, control systems, and motion planning.
Is Arduino good for learning robotics?
Yes. Arduino is particularly suitable for learning the fundamentals of sensors, actuators, microcontrollers, PWM, and embedded programming. Arduino’s official learning resources and hardware ecosystem provide a strong starting point.
Do I need ROS 2 to build a robot?
No. ROS 2 is useful for more complex robotic systems, but many hobby and educational robots can be programmed directly using a microcontroller or single-board computer.
Should I learn Arduino or Raspberry Pi first?
For beginners interested primarily in electronics, sensors, and motor control, Arduino is often the simpler starting point. Raspberry Pi becomes especially useful when the project requires Linux, networking, Python applications, computer vision, or more computational resources.
What programming language should I learn for robotics?
There is no single language for every robot. Arduino projects commonly use the Arduino programming environment, while Python and C++ are widely used in more advanced robotics. ROS 2 supports development through client libraries such as Python and C++.
What is the most important concept in robot programming?
A strong starting point is understanding the sense → decide → act cycle. Once this concept is clear, many robotic behaviors can be broken down into smaller and easier programming tasks.
22- Conclusion
Programming a robot does not have to be difficult.
The key is to avoid treating robotics as one huge problem. Instead, divide the system into smaller parts:
Sensors provide information.
The controller processes the information.
The program makes decisions.
Motor drivers and actuators execute the commands.
The robot continuously repeats the process and responds to new information.
A beginner can start with an Arduino, a motor, and a sensor. After understanding the fundamentals, more sophisticated features such as encoders, closed-loop control, state machines, computer vision, and ROS 2 can be introduced.
For hobbyists, this provides an accessible way to experiment and learn. For engineers, the same fundamental concepts provide the foundation for designing larger and more reliable robotic systems.
The most effective approach is therefore not to begin with the most complicated robot possible. Start with one simple behavior, make it work reliably, understand why it works, and then build on it.
برمجة الروبوت ليست بالأمر الصعب!
قائمة المحتويات
- المقدمة
- لماذا تبدو برمجة الروبوت أسهل مما تتوقع؟
- ماذا تعني برمجة الروبوت؟
- البنية الأساسية للروبوت
- اختيار منصة البرمجة المناسبة
- فهم المدخلات والقرارات والمخرجات
- كيف تساعد المستشعرات الروبوت على فهم بيئته؟
- كيف تجعل المحركات والمشغلات الروبوت قادرًا على الحركة؟
- حلقة التحكم في الروبوت
- ابدأ بسلوكيات روبوت بسيطة
- استخدام Arduino لبرمجة الروبوت
- استخدام المكتبات لتبسيط برمجة الروبوت
- الانتقال من التحكم اليدوي إلى التشغيل الذاتي
- استخدام الشروط واتخاذ القرارات
- استخدام آلات الحالات لتنظيم البرامج بشكل أفضل
- برمجة الروبوتات المتقدمة باستخدام ROS 2
- اختبار الروبوت واكتشاف الأخطاء وإصلاحها
- الأخطاء الشائعة عند برمجة الروبوتات
- مسار عملي لتعلُّم برمجة الروبوتات للمبتدئين
- اعتبارات السلامة عند برمجة الروبوتات
- الأسئلة الشائعة
- الخاتمة
مدة القراءة حوالي : 20 دقيقة
1- المقدمة
مرحباً بكم في عالم الروبوتات المثير! ينظر الكثير من الناس إلى الآلات المعقدة ويظنون، “لن أتمكن أبداً من برمجة هذا”. ولكن الحقيقة هي أن برمجة الروبوتات ليست صعبة كما تظن! سواء كنت هاوياً في بداية طريقك، أو مبتدئاً يبحث عن تحدٍ جديد، أو مهندساً خبيراً، فإن رحلة إحياء الآلة متاحة للجميع. في هذا المقال، سنقوم بتبسيط تعقيدات برمجة الروبوتات إلى خطوات سهلة وقابلة للإدارة، مما يمنحك المعرفة اللازمة لبناء وبرمجة إبداعاتك الروبوتية الخاصة.
2- لماذا تبدو برمجة الروبوتات أسهل مما هي عليه؟
قد تبدو برمجة الروبوتات كمهمة معقدة تتطلب رياضيات متقدمة، أو ذكاءً اصطناعياً، أو خبرة برمجية واسعة. ولكن في الواقع، يمكن بناء وبرمجة العديد من مشاريع الروبوتات باستخدام عدد قليل من المفاهيم الأساسية.
يحتاج الروبوت البسيط عادةً إلى القيام بثلاثة أشياء أساسية:
- قراءة المعلومات من المستشعرات.
- اتخاذ قرار بناءً على تلك المعلومات.
- التحكم في مخرج، مثل محرك، أو سيرفو، أو مصباح LED، أو جرس إنذار، أو مشغل.
هذا يخلق دورة بسيطة:
استشعار ← اتخاذ قرار ← تنفيذ ← استشعار مرة أخرى
بمجرد فهم هذا المبدأ، تصبح برمجة الروبوت أسهل بكثير في التعامل معها.
بالنسبة للمبتدئين والهواة، توفر منصات مثل “أردوينو” (Arduino) طريقة مباشرة لتعلم هذه المفاهيم. توفر الوثائق الرسمية لأردوينو دروساً تغطي البرمجة، والمدخلات الرقمية والتناظرية، وتعديل عرض النبضة (PWM)، والمكتبات، والمشاريع المتعلقة بالمحركات.
أما بالنسبة للمهندسين ومشاريع الروبوتات الأكثر تقدماً، توفر أطر عمل مثل ROS 2 نهجاً أكثر تنظيماً لتقسيم تطبيق الروبوت إلى مكونات برمجية منفصلة تتواصل مع بعضها البعض.
النقطة المهمة هي أنك لست مضطراً للبدء بنظام روبوتي متقدم. يمكنك البدء بمحرك واحد، ومستشعر واحد، وبرنامج صغير، ثم زيادة التعقيد تدريجياً.
3- ماذا تعني برمجة الروبوت؟
برمجة الروبوت تعني إنشاء تعليمات تخبر الروبوت بكيفية الاستجابة للمعلومات وتنفيذ الإجراءات.
على سبيل المثال، فكر في روبوت بسيط يتجنب العوائق. يمكن للروبوت أن يتبع التسلسل التالي:
- قراءة مستشعر المسافة.
- تحديد ما إذا كان هناك عائق قريب.
- إذا كان المسار واضحاً، تحرك للأمام.
- إذا تم رصد عائق، توقف.
- استدر في اتجاه آخر.
- استمر في الحركة.
- كرر العملية.
لا يحتاج البرنامج إلى فهم العالم بنفس الطريقة التي يفهمها الإنسان. فهو يحتاج فقط إلى معالجة المعلومات المقدمة من مستشعراته وتنفيذ القواعد المبرمجة.
هذا هو أحد أهم المفاهيم لأي شخص يبدأ في مجال الروبوتات: الروبوت يصبح ذكياً من خلال الجمع بين الاستشعار، واتخاذ القرار، والتنفيذ.
4- البنية الأساسية للروبوت
يمكن تقسيم الروبوت الصغير النموذجي إلى عدة أجزاء رئيسية:
وحدة التحكم (المتحكم)
وحدة التحكم هي “الدماغ” الإلكتروني للروبوت. تشمل الأمثلة:
- لوحات أردوينو (Arduino).
- اللوحات القائمة على ESP32.
- حواسيب Raspberry Pi.
- المتحكمات الدقيقة الأخرى وحواسيب اللوحة الواحدة.
تقوم وحدة التحكم بتنفيذ البرنامج والتواصل مع المستشعرات والمشغلات.
المستشعرات
توفر المستشعرات معلومات عن الروبوت وبيئته. تشمل الأمثلة:
- مستشعرات المسافة بالموجات فوق الصوتية.
- المستشعرات تحت الحمراء.
- مستشعرات الضوء.
- مستشعرات درجة الحرارة.
- أجهزة التشفير (Encoders).
- مقاييس التسارع والجيروسكوبات.
- الكاميرات.
مشغل المحرك
عادةً لا ينبغي للمتحكم الدقيق تشغيل محرك تيار مستمر مباشرة من طرف إدخال/إخراج ذو أغراض عامة (GPIO). يتم استخدام مشغل محرك أو دائرة تحكم في المحرك عادةً بين وحدة التحكم والمحرك. يوفر هذا الواجهة الكهربائية المناسبة ويسمح لوحدة التحكم بأوامر المحرك بأمان ضمن مواصفات المشغل.
المحركات والمشغلات
هذه المكونات تحول الأوامر الكهربائية إلى حركة فيزيائية. تشمل الأمثلة:
- محركات التيار المستمر (DC Motors).
- محركات السيرفو (Servo Motors).
- المحركات الخطوية (Stepper Motors).
- المشغلات الخطية.
مزود الطاقة
يوفر نظام الطاقة الطاقة المطلوبة لوحدة التحكم، والمستشعرات، والمحركات، والمكونات الأخرى. يجب التعامل مع الطاقة كجزء من تصميم الروبوت، وليس كفكرة لاحقة. يمكن أن تقدم المحركات متطلبات تيار مختلفة بشكل كبير عن دوائر المنطق، لذا يجب أن تكون بنية الطاقة مناسبة للأجهزة المستخدمة.
5- اختيار منصة البرمجة المناسبة
يجب أن تتطابق منصة البرمجة مع تعقيد الروبوت.
أردوينو (Arduino)
أردوينو نقطة انطلاق ممتازة لتعلم الروبوتات لأنه يجمع بين الأجهزة التي يسهل الوصول إليها ونظام برمجيات كبير. تغطي مواد التعلم الرسمية لأردوينو أساسيات البرمجة، والأطراف الرقمية، والمدخلات التناظرية، وتعديل عرض النبضة، والمكتبات، والتحكم في السيرفو، والمفاهيم الأخرى المفيدة في الروبوتات. وهو مناسب بشكل خاص لـ:
- روبوتات المبتدئين.
- روبوتات تتبع الخط.
- روبوتات تجنب العوائق.
- الروبوتات المتنقلة الصغيرة.
- المشاريع القائمة على السيرفو.
- تجارب المستشعرات ومشاريع التحكم في المحركات.
MicroPython والبيئات المماثلة
تدعم بعض اللوحات الحديثة لغة MicroPython، مما يسمح للمطورين ببرمجة الأنظمة المدمجة باستخدام بايثون. روبوت Alvik من أردوينو، على سبيل المثال، يدعم MicroPython، وبرمجة أردوينو، والبرمجة القائمة على الكتل، مما يوضح كيف يمكن استخدام أساليب برمجة مختلفة لتعليم الروبوتات.
Raspberry Pi والمنصات القائمة على لينكس
يصبح حاسوب من فئة Raspberry Pi مفيداً عندما يتطلب الروبوت موارد حاسوبية أكبر، مثل:
- الرؤية الحاسوبية.
- الشبكات ومعالجة البيانات.
- برامج الروبوتات عالية المستوى وتطبيقات بايثون.
- التكامل مع أجهزة الحاسوب الأخرى.
نظام ROS 2
ROS 2 أكثر ملاءمة عندما يكون للروبوت بنية برمجية أكبر تتضمن عمليات أو مكونات حاسوبية متعددة. ينظم ROS 2 التطبيقات حول العقد وواجهات الاتصال. يمكن للعقد نشر والاشتراك في المواضيع، وتقديم أو استخدام الخدمات، واستخدام الإجراءات للمهام طويلة الأمد. الدرس المهم هو أن ليس كل روبوت يحتاج إلى ROS 2. غالباً ما يمكن برمجة روبوت أردوينو صغير ببساطة أكبر دون إدخال إطار عمل للروبوتات.
6- فهم المدخلات، والقرارات، والمخرجات
إحدى أسهل الطرق لفهم برمجة الروبوتات هي تقسيم البرنامج إلى ثلاث مراحل:
- المدخلات: يتلقى الروبوت المعلومات. (مثال: المسافة = 15 سم).
- القرار: يقيم البرنامج المعلومات. (مثال: إذا كانت المسافة < 20 سم، فإن العائق قريب جداً).
- المخرجات: ينفذ الروبوت إجراءً. (مثال: أوقف المحركات واستدر لليمين).
يمكن تمثيل هذا بـ: مستشعر ← منطق البرنامج ← محرك. مع تقدم الروبوت، يمكن إضافة مستشعرات وخوارزميات وأنظمة تحكم إضافية إلى هذه البنية الأساسية.
7- كيف تساعد المستشعرات الروبوت على فهم بيئته؟
لا يمكن للروبوت اتخاذ قرارات مفيدة بدون معلومات. المستشعر يحول الحالة الفيزيائية إلى بيانات يمكن للمتحكم معالجتها.
- يمكن استخدام مستشعر الموجات فوق الصوتية لتقدير المسافة إلى جسم ما.
- يمكن لمستشعر الضوء تقديم معلومات حول السطوع.
- يمكن لجهاز التشفير تقديم معلومات تتعلق بدوران العجلة.
ثم يقوم البرنامج بتحويل هذه المعلومات إلى قرار. (مثال: إذا كانت المسافة أكبر من 30 سم ← تحرك للأمام. إذا كانت المسافة أقل من أو تساوي 30 سم ← توقف واستدر). المستشعر نفسه لا يقرر ما يجب أن يفعله الروبوت؛ البرنامج هو الذي يحدد كيفية تفسير بيانات المستشعر.
8- كيف تجعل المحركات والمشغلات الروبوت يتحرك؟
المحركات مسؤولة عن تحويل الطاقة الكهربائية إلى حركة ميكانيكية. المحركات المختلفة تناسب تطبيقات مختلفة:
- محركات التيار المستمر: تُستخدم عادةً للروبوتات المتنقلة لأنها يمكن أن تدور باستمرار وبسيطة التحكم نسبياً.
- محركات السيرفو: مفيدة عندما يحتاج الروبوت إلى تحديد موقع زاوي متحكم فيه. تُستخدم عادةً للأذرع الروبوتية، وآليات مسح المستشعرات، وأنظمة الإمالة والتدوير.
- المحركات الخطوية: مفيدة عندما تكون هناك حاجة إلى حركة تدريجية متحكم فيها أو تحديد موقع. يمكنها التحرك في خطوات فردية.
9- حلقة التحكم في الروبوت
عادةً لا ينفذ الروبوت تعليم واحدة ثم يتوقف. بدلاً من ذلك، يكرر باستمرار حلقة تحكم. يبدو برنامج الروبوت المبسط هكذا:
- قراءة المستشعرات.
- معالجة المعلومات.
- اتخاذ قرار.
- التحكم في المشغلات.
- الانتظار أو تنفيذ عمليات التوقيت.
- قراءة المستشعرات مرة أخرى.
- التكرار.
هذه الحلقة أساسية في الروبوتات. على سبيل المثال، قد يقيس روبوت تجنب العوائق باستمرار مسافته من الأجسام القريبة ويضبط أوامر المحرك وفقاً لذلك. كلما كانت هذه الحلقة تعمل بشكل أسرع وأكثر موثوقية، أصبح الروبوت أكثر استجابة.
10- ابدأ بسلوكيات روبوتية بسيطة
خطأ شائع هو محاولة بناء روبوت مستقل تماماً فوراً. النهج الأفضل هو تطوير سلوك واحد في كل مرة:
- الخطوة 1: اختبار محرك واحد. ابدأ بجعل محرك واحد يدور. تحقق من اتجاه المحرك، وتشغيل مشغل المحرك، وإمداد الطاقة، والأسلاك، والتحكم في السرعة.
- الخطوة 2: اختبار كلا المحركين. بمجرد عمل محرك واحد، تحكم في كلا المحركين. لإنشاء أوامر أساسية مثل: للأمام، للخلف، استدر يسار، استدر يمين، توقف.
- الخطوة 3: إضافة مستشعر واحد. قم بتوصيل مستشعر واحد واعرض قراءاته. قبل جعل الروبوت مستقلاً، تأكد من صحة بيانات المستشعر.
- الخطوة 4: دمج المستشعر والمحركات. الآن أنشئ قاعدة بسيطة: إذا اكتشف المستشعر عائقاً، قم بتغيير أوامر المحرك.
هذا النهج التدريجي يجعل استكشاف الأخطاء وإصلاحها أسهل considerably.
11- استخدام أردوينو لبرمجة الروبوت
أردوينو مفيد بشكل خاص للمبتدئين لأن سير العمل التطويري مباشر نسبياً. سير العمل النموذجي هو:
- اختر لوحة أردوينو المناسبة.
- قم بتثبيت أو فتح بيئة تطوير أردوينو (IDE).
- قم بتوصيل اللوحة بالحاسوب.
- اكتب أو عدل sketch (البرنامج).
- حدد اللوحة والمنفذ.
- قم بترجمة البرنامج.
- قم برفع البرنامج.
- اختبر الروبوت، راقب النتائج، عدل البرنامج وكرر.
12- استخدام المكتبات لتبسيط برمجة الروبوت
لا تحتاج دائماً إلى كتابة كل وظيفة للتحكم في الأجهزة بنفسك. توفر المكتبات مكونات برمجية قابلة لإعادة الاستخدام تسمح للبرنامج بالتواصل مع الأجهزة بسهولة أكبر.
- قد يستخدم مشروع الروبوتات مكتبة لـ: مشغل محرك، سيرفو، شاشة، مستشعر، أو وحدة اتصال.
- بالنسبة للمبتدئين، تقلل المكتبات من التعقيد غير الضروري.
- بالنسبة للمهندسين، يمكنها أيضاً تقليل وقت التطوير وتوفير تجريدات مختبرة.
13- من التحكم اليدوي إلى التشغيل المستقل
تطور مفيد للروبوت المتنقل هو:
- التحكم اليدوي: يتحكم المستخدم مباشرة في الروبوت. (مثال: زر ← متحكم ← محرك).
- التحكم المساعد: يتحكم المستخدم في الروبوت، لكن المستشعرات تساعد في منع مشاكل معينة. (مثال: يتوقف الروبوت تلقائياً عند رصد عائق).
- التحكم المستقل: يتخذ الروبوت قرارات بناءً على معلومات المستشعر بدون إدخال بشري مستمر. (مثال: مستشعر ← خوارزمية قرار ← أوامر محرك).
14- استخدام الشروط واتخاذ القرارات
العبارات الشرطية هي من أهم أدوات البرمجة في الروبوتات. قد يستخدم الروبوت البسيط قواعد مثل:
- إذا كان المسار واضحاً ← تحرك للأمام.
- إذا تم رصد عائق ← توقف.
- إذا كان العائق على اليسار ← استدر لليمين.
- إذا كانت البطارية منخفضة ← أوقف الروبوت.
المفتاح هو الحفاظ على المنطق مفهوماً. بدلاً من إنشاء برنامج واحد ضخم، قم بتقسيم سلوك الروبوت إلى وظائف أصغر (مثل: readSensors, calculateDecision, moveForward). هذا يجعل البرنامج أسهل في الاختبار والصيانة.
15- استخدام آلات الحالات لبرامج أكثر تنظيماً
مع زيادة تعقيد سلوك الروبوت، يمكن أن يصبح مجموعة من عبارات “if” صعبة الصيانة. توفر آلة الحالات نهجاً أنظف. على سبيل المثال، قد يكون للروبوت المتنقل هذه الحالات:
- خامل (IDLE).
- يتحرك للأمام (MOVING_FORWARD).
- تم رصد عائق (OBSTACLE_DETECTED).
- يدور (TURNING).
تحدد كل حالة ما يجب أن يفعله الروبوت وما هو الشرط الذي يسبب انتقاله إلى حالة أخرى. آلات الحالات مفيدة بشكل خاص عندما يحتاج الروبوت إلى إدارة عدة سلوكيات دون أن يفقد المسار لما يفعله حالياً.
16- برمجة الروبوتات المتقدمة باستخدام ROS 2
عندما يصبح الروبوت أكثر تعقيداً، قد لا يكون برنامج المتحكم الدقيق الواحد هو البنية الأكثر ملاءمة. يقدم ROS 2 مفهوم العقد، حيث يمكن لكل عقدة أداء وظيفة منطقية داخل نظام الروبوت. يمكن أن تتواصل العقد مع بعضها البعض من خلال المواضيع، والخدمات، والإجراءات.
على سبيل المثال، قد يحتوي روبوت أكبر على مكونات برمجية منفصلة لـ:
- معالجة الكاميرا والمستشعرات.
- التحديد الموقعي والملاحة.
- التحكم في المحرك وواجهة المستخدم.
تسمح هذه البنية للمهندسين ببناء أنظمة روبوتية أكثر تعقيداً دون وضع كل الوظائف في برنامج واحد كبير. ومع ذلك، يقدم ROS 2 مفاهيم وبنية تحتية إضافية، لذا من الأفضل عادةً فهم البرمجة الأساسية، والمستشعرات، والمشغلات، والتحكم أولاً.
17- اختبار الروبوت وتصحيح الأخطاء
برمجة الروبوتات ليست مجرد كتابة كود ورفعه. الاختبار جزء أساسي من تطوير الروبوتات.
- اختبار الأجهزة أولاً: قبل تصحيح أخطاء البرنامج، تحقق من إمداد الطاقة، واتصالات التأريض، وأسلاك مشغل المحرك، واتصالات المستشعر، ومستويات الجهد الصحيحة، والتجميع الميكانيكي.
- اختبار كل مكون بشكل منفصل: اختبر المحرك بدون المستشعر. ثم اختبر المستشعر بدون المحرك. ثم اجمعهما. هذا يسهل تحديد مصدر المشكلة.
- استخدام المراقبة التسلسلية: يمكن أن يوفر الإخراج التسلسلي معلومات مفيدة حول قراءات المستشعر وقرارات البرنامج.
- تغيير شيء واحد في كل مرة: إذا قمت بتغيير خمسة أجزاء من البرنامج في وقت واحد، يصبح من الصعب معرفة أي_change أصلح أو سبب المشكلة. النهج الهندسي الأفضل هو: تغيير ← اختبار ← ملاحظة ← تسجيل ← متابعة.
18- أخطاء شائعة في برمجة الروبوتات
- محاولة بناء كل شيء دفعة واحدة: ابدأ بنظام صغير يعمل. الروبوت الذي يتحرك للأمام بشكل موثوق هو نقطة انطلاق أفضل من روبوت معقد لا يفعل شيئاً بشكل موثوق.
- تجاهل متطلبات الطاقة: يمكن أن تخلق المحركات مشاكل كهربائية تبدو كمشاكل برمجية. عمليات إعادة التعيين غير المتوقعة، أو عدم استقرار المستشعر، يمكن أن تنشأ أحياناً من ترتيب طاقة غير مناسب.
- اختبار النظام الكامل فقط: إذا فشل الروبوت الكامل، قد يكون من الصعب تحديد المشكلة. اختبر الأنظمة الفرعية الفردية أولاً.
- كتابة برنامج واحد كبير: كتل الكود الكبيرة يصعب فهمها وصيانتها. استخدم الوظائف وبنية برنامج واضحة.
- تجاهل ضوضاء المستشعر: المستشعرات الحقيقية ليست مستقرة دائماً بشكل مثالي. قد تكون هناك حاجة للتصفية، أو المتوسط، أو التباطؤ.
- افتراض أن الروبوت سيتصرف تماماً مثل المحاكاة: الروبوت الحقيقي يحتوي على احتكاك ميكانيكي، وانزلاق العجلات، واختلافات في المحرك، وتغيرات في جهد البطارية، وأخطاء في المستشعر.
19- مسار تعلم عملي للمبتدئين
يمكن لمسار التعلم المنظم أن يجعل الروبوتات أسهل بكثير:
- المستوى 1: تعلم أساسيات البرمجة. ابدأ بالمتغيرات، وأنواع البيانات، والشروط، والحلقات، والوظائف، وتصحيح الأخطاء الأساسي.
- المستوى 2: تعلم أساسيات المتحكم الدقيق. تعلم المدخلات والمخرجات الرقمية، والمدخلات التناظرية، وPWM، والاتصال التسلسلي.
- المستوى 3: التحكم في الأجهزة البسيطة. اعمل مع مصابيح LED، وأزرار، وجرس إنذار، وسيرفو، ومحركات تيار مستمر.
- المستوى 4: إضافة المستشعرات. جرب مستشعرات المسافة، والضوء، وأجهزة التشفير، ووحدات القياس بالقصور الذاتي (IMUs).
- المستوى 5: بناء روبوت متنقل بسيط. اجمع: متحكم + مشغل محرك + محركات + مستشعر. ثم نفذ سلوكاً مستقلاً بسيطاً.
- المستوى 6: تحسين خوارزمية التحكم. استكشف تصفية المستشعر، وتحكم PID، والتحكم في الحلقة المغلقة، وآلات الحالات.
- المستوى 7: الانتقال نحو الروبوتات المتقدمة. للأنظمة الأكبر، ابدأ في تعلم لينكس، وبايثون، وC++، وROS 2، ومحاكاة الروبوتات، والرؤية الحاسوبية.
20- اعتبارات السلامة عند برمجة الروبوتات
يمكن أن يحتوي الروبوت على أجزاء ميكانيكية متحركة ومكونات كهربائية ذات تيار عالٍ، لذا يجب دائماً مراعاة السلامة أثناء التطوير. قبل الاختبار:
- أبقِ أصابعك بعيداً عن الآليات المتحركة.
- أمّن الروبوت بحيث لا يمكنه التحرك بشكل غير متوقع.
- تحقق من الأسلاك قبل تطبيق الطاقة.
- استخدم مشغلات محركات ومزودات طاقة مناسبة.
- تجنب الدوائر القصيرة.
- اختبر البرامج الجديدة بسرعة منخفضة عندما يكون ذلك ممكناً.
- احصل على طريقة موثوقة لفصل الطاقة.
- لا تترك روبوتاً تجريبياً يعمل بدون إشراف.
ممارسة تطويرية مفيدة هي اختبار الروبوت مع رفع العجلات عن الأرض عندما يكون ذلك مناسباً. هذا يسمح بالتحقق من أوامر المحرك قبل السماح للروبوت بالتحرك بحرية.
21- الأسئلة الشائعة
- هل برمجة الروبوتات صعبة على المبتدئين؟ قد تبدو صعبة لأن الروبوتات تجمع بين البرمجة، والإلكترونيات، والميكانيكا، والتحكم. ومع ذلك، يمكن للمبتدئ البدء ببرامج بسيطة تتضمن مستشعراً واحداً ومشغلاً واحداً.
- هل أحتاج إلى رياضيات متقدمة لبرمجة روبوت؟ ليس لمشاريع الروبوتات الأساسية. يمكن برمجة الروبوتات البسيطة باستخدام مفاهيم البرمجة الأساسية. تصبح الرياضيات مهمة بشكل متزايد لمجالات مثل الحركة، والتحديد الموقعي، والرؤية الحاسوبية.
- هل أردوينو جيد لتعلم الروبوتات؟ نعم. أردوينو مناسب بشكل خاص لتعلم أساسيات المستشعرات، والمشغلات، والمتحكمات الدقيقة، والبرمجة المدمجة.
- هل أحتاج إلى ROS 2 لبناء روبوت؟ لا. ROS 2 مفيد للأنظمة الروبوتية الأكثر تعقيداً، ولكن يمكن برمجة العديد من روبوتات الهواة والتعليمية مباشرة باستخدام متحكم دقيق.
- هل يجب أن أتعلم أردوينو أم Raspberry Pi أولاً؟ للمبتدئين المهتمين بالإلكترونيات والتحكم في المحركات، أردوينو غالباً ما يكون نقطة انطلاق أبسط. يصبح Raspberry Pi مفيداً بشكل خاص عندما يتطلب المشروع لينكس، أو الرؤية الحاسوبية.
- ما هي لغة البرمجة التي يجب أن أتعلمها للروبوتات؟ لا توجد لغة واحدة لكل روبوت. تستخدم مشاريع أردوينو بيئة أردوينو، بينما تُستخدم بايثون وC++ على نطاق واسع في الروبوتات المتقدمة.
- ما هو أهم مفهوم في برمجة الروبوتات؟ نقطة انطلاق قوية هي فهم دورة “استشعار ← اتخاذ قرار ← تنفيذ”. بمجرد وضوح هذا المفهوم، يمكن تقسيم العديد من السلوكيات الروبوتية إلى مهام برمجة أصغر وأسهل.
22- الخاتمة
برمجة الروبوت لا يجب أن تكون صعبة. المفتاح هو تجنب التعامل مع الروبوتات كمشكلة واحدة ضخمة. بدلاً من ذلك، قم بتقسيم النظام إلى أجزاء أصغر:
- توفر المستشعرات المعلومات.
- تقوم وحدة التحكم بمعالجة المعلومات.
- يتخذ البرنامج القرارات.
- تنفذ مشغلات المحركات والمشغلات الأوامر.
- يكرر الروبوت العملية باستمرار ويستجيب للمعلومات الجديدة.
يمكن للمبتدئ أن يبدأ بأردوينو، ومحرك، ومستشعر. بعد فهم الأساسيات، يمكن إدخال ميزات أكثر تطوراً مثل أجهزة التشفير، والتحكم في الحلقة المغلقة، وآلات الحالات، والرؤية الحاسوبية، وROS 2.
بالنسبة للهواة، يوفر هذا طريقة سهلة للتجربة والتعلم. بالنسبة للمهندسين، توفر نفس المفاهيم الأساسية الأساس لتصميم أنظمة روبوتية أكبر وأكثر موثوقية.
لذلك، فإن النهج الأكثر فعالية ليس البدء بأكثر روبوت تعقيداً ممكن. ابدأ بسلوك بسيط واحد، اجعله يعمل بشكل موثوق، افهم سبب عمله، ثم ابنِ عليه.


Leave a comment
You must be logged in to post a comment.